Hey everyone, Adam here. We hope that you’ve started on and are enjoying our sister-series An Engineers Guide to the Big Picture. While those articles focus on the overall energy theories and the “Why?” behind going solar, this series will be dedicated to the real, practical world of solar installations. You may be asking “Why is a solar contracting company writing a Do It Yourself guide? Don’t they want me to hire Whaling City Solar to do my installation?” Well….yes…we do, but only if you value the benefits of having us the professionals take the reigns. So to that end we’re going to pull back the curtain and show you the major operation steps we do week in and week out for our customers, and let you draw your own conclusions whether you could tackle your own solar project yourself. Enjoy!
Step 1: Self qualify the sunlight on your property
Out of pocket Cost: $0 (but a few hours of dedicated research time to learn the terminology)
We can make this simple right off the bat: If you’ve got an area on your property (like say a roof!) that gets a lot of sun with minimal shade, you’re a great candidate for solar. Is that over-simplified? Sure, but it’s that easy to get the spark started for this idea of energy independence that will grow into a roaring blaze as you learn more and more about how solar integrates into the property. We want you to understand that a solar project is really nothing more than a series of equipment safely tied into your homes electrical infrastructure. The brand, model and number of panels, inverters, etc. you choose will dictate the assembled product’s capacity to generate power. That capacity is what we refer to as the system’s “size” measured in watts (W) or thousands of watts (kW). That equipment will cost the same to buy, permit and install regardless of where you decide to put it – whether it’s sunny or shaded, in Texas or Maine, facing up towards the sky or straight into a wall. However, the amount of electricity (measured in kWh’s) generated by a given size of a system (kW) is directly related to how much sunlight reaches them. This is an important point, because the payback or financial benefit of a solar system lies in the relationship between the cost to install the system and dollar value of the electricity it produces. The same size system in a sunny area is a higher yielding investment than one in a shaded area.
Basic Principles
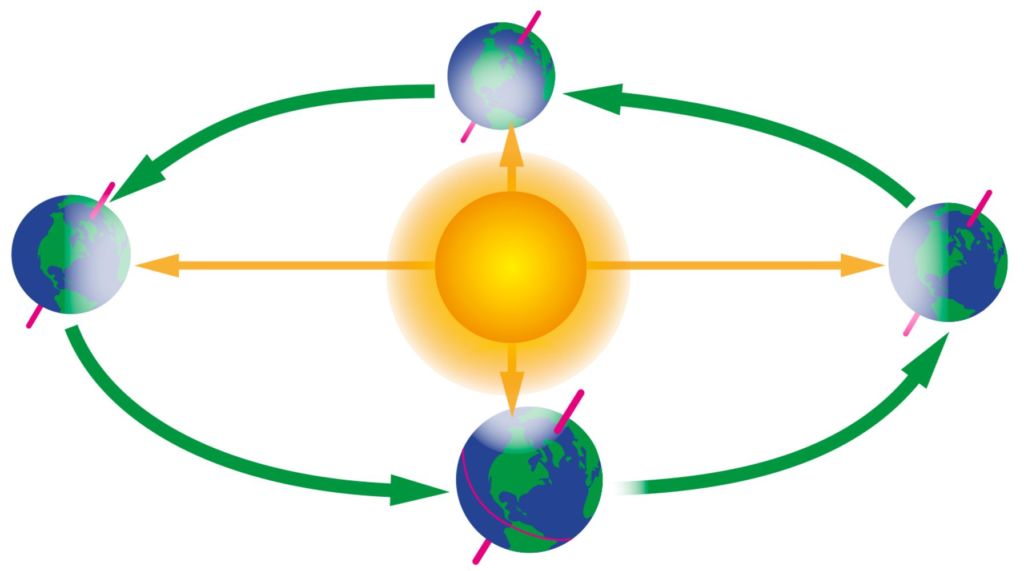
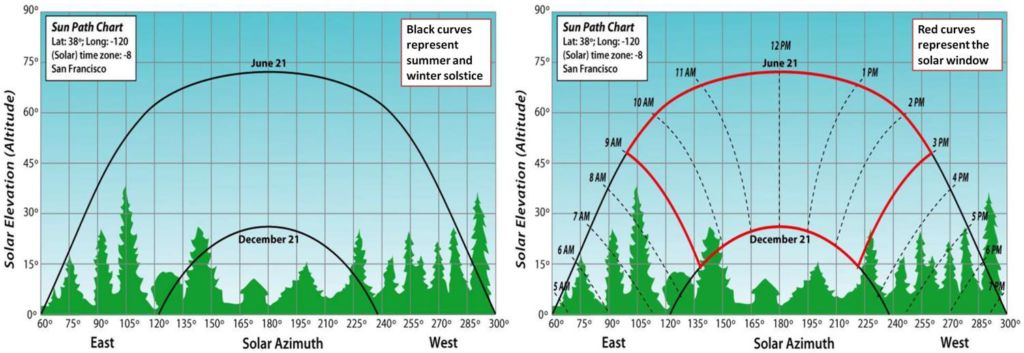
Starting with the basics, because the Earth is round, the sun strikes the surface at different angles, ranging from 0° (just above the horizon) to 90° (directly overhead). When the sun’s rays are vertical, the Earth’s surface gets all the energy possible. The more slanted the sun’s rays are, the longer they travel through the atmosphere, becoming more scattered and diffuse. Because the Earth is round, the frigid polar regions never get a high sun, and because of the tilted axis of rotation, these areas receive no sun at all during part of the year.
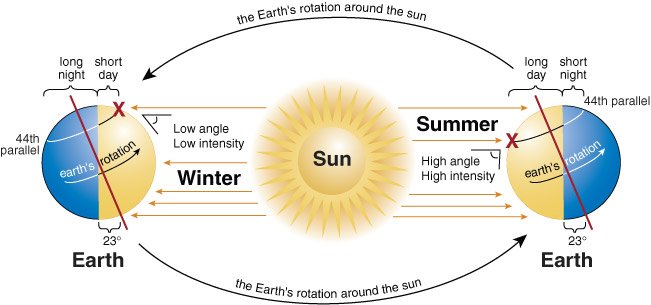
Since your solar equipment is going to be operating year round, you should care much more about the average level of sun all year than what you see on the sunniest days. Unfortunately we as humans are pretty terrible at estimating how much sun we get on average over 365 days because it’s tough to quantify. Countries such as the United States, which lie in the middle latitudes, receive more solar energy in the summer not only because days are longer, but also because the sun is nearly overhead. The sun’s rays are far more slanted during the shorter days of the winter months. For us in MA (roughly 41° latitude) we receive nearly double the solar energy in June than we do in December.
Getting to a usable number of kWh
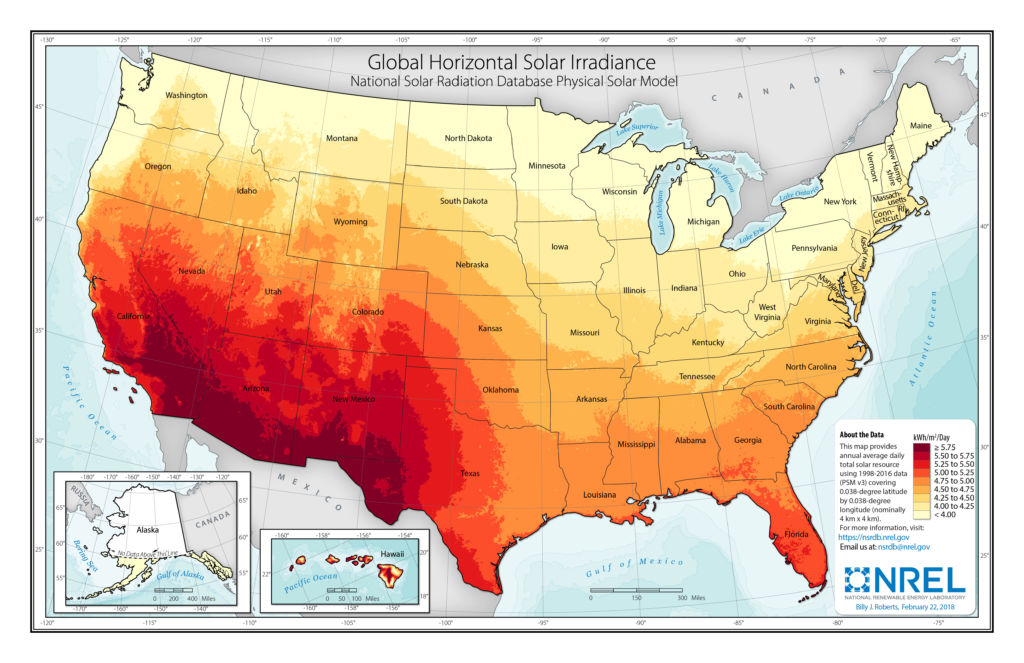
Averaging all 4 seasons of sunlight together you can get an average amount of sunlight reaching your property compared to other latitudes in the US. However to get from this Irradiance map (shown in W/m^2) to a usable number of kWh’s we can take off our bills, it will take more math to adjust for other variables than we have time or space to go into here.
Thankfully our federal government helps fund a free solar calculator, created by the National Renewable Energy Laboratory (NREL). You can visit their website here, called PVWatts. However to use this website to it’s maximum benefit you’ll need to know a bit more about the inputs the calculator uses to make sure you’re getting useful data out of it. Those inputs are the same variables we’d be using doing math the long way:
- Irradiance
- DC System Size (kW)
- System Losses (%)
- Tilt (deg)
- Azimuth (deg)
- Retail Rate ($/kWh)
Using the PVWatts Calculator

The first step is using entering your home address to look up your home’s irradiance out of their database, as if we were zooming on the yellow and orange map of the US above. Here we’re using New Bedford.
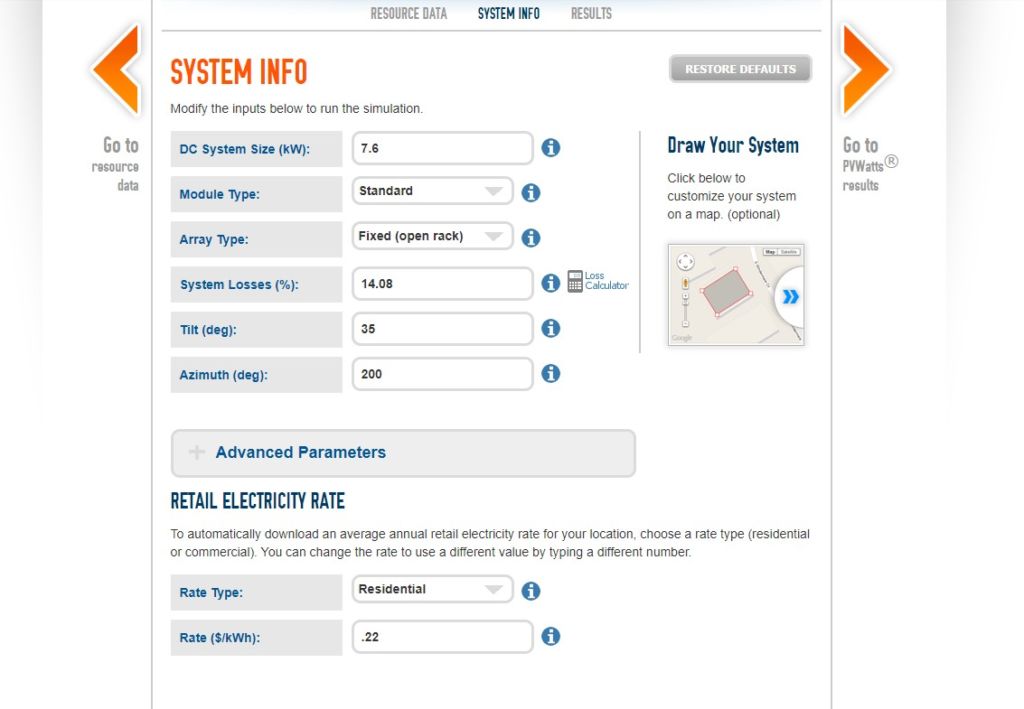
Next are the system parameters, most of which are probably new terms for you. Let’s define them and learn some more about each first:
DC System Size (kW)
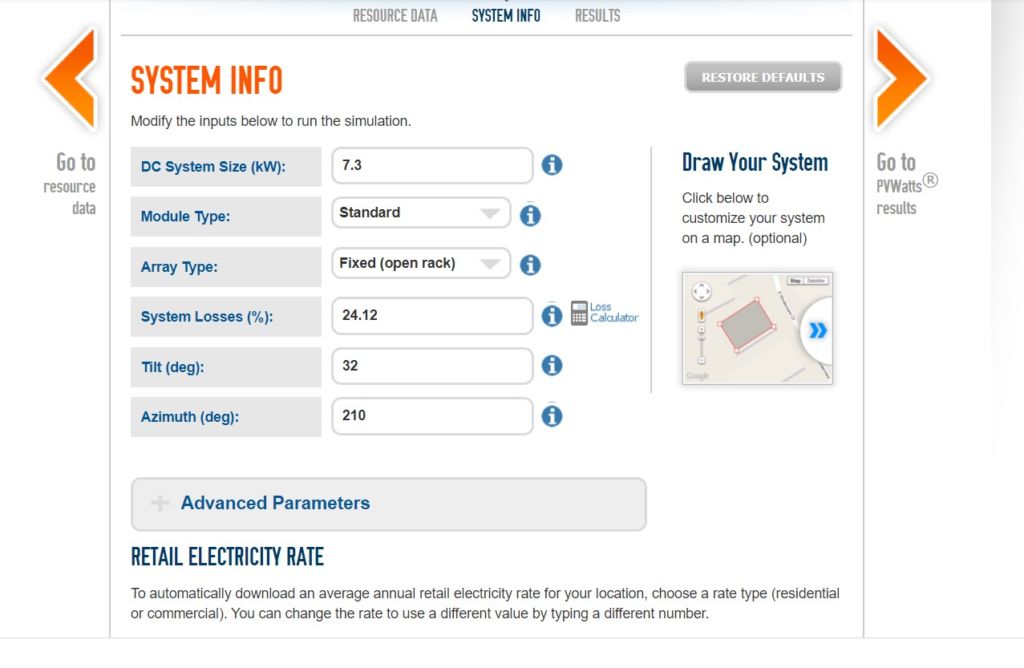
As we discussed in our intro, the DC system size is the capacity of the solar array to generate electricity. Each individual brand and model like say a REC365WAA Black, has an associated DC wattage, in the case of the linked panel 365W. The sum of all the panels in the array is the system size, so if you can fit 20 panels on your roof, you would say the system size is 20 x 365W = 7300W which converts to ~7.3kW. You can leave the module type and array type at their default values.
System Losses (%)
This field of system losses represents all the losses except for the tilt and orientation which are accounted for separately. The defaults are good enough for most of the fields like soiling, wiring %, etc. but I do want to point out a field that many homeowners overlook when doing their own PVWatts calculations – Shading. Access this by clicking on the Loss Calulator button next to system losses.
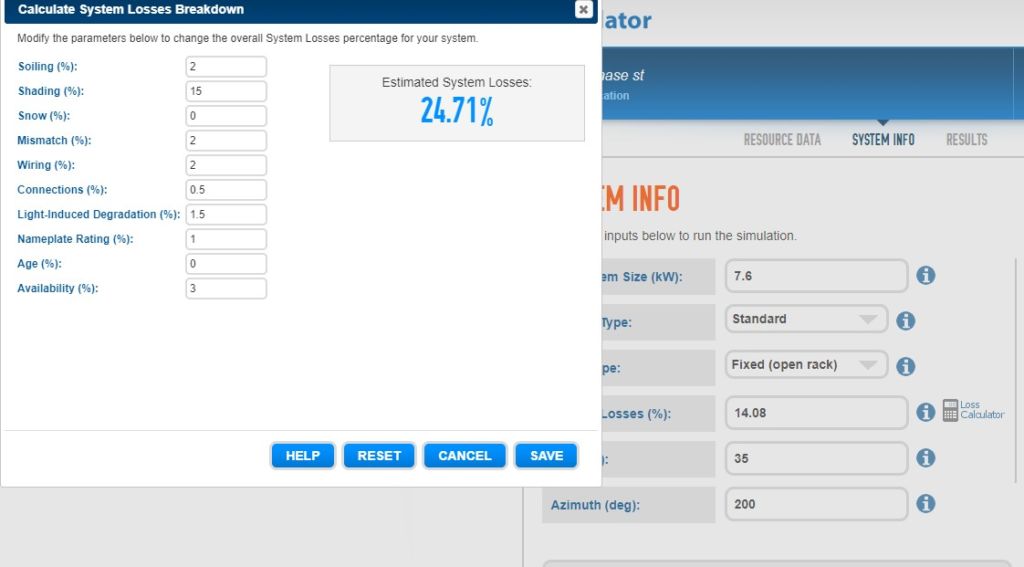
Since the sun follows different paths seasonally, most of us don’t notice the extra shade that reaches our roofs in the winter from the tree line around our homes. Industry professionals use special tools like the Solmetric SunEye or LIDAR based shading software (like the Aurora software that Whaling City Solar uses on all of our proposals) to dial this shading percentage in very tightly. For your purposes, use your best judgement. For example that tall oak 40ft from the house that doesn’t shade in the summer but does for 2 hours midday in winter, maybe 10%. That row of tall privacy arborvitaes down the east side of your property that black morning sun till 9am in the summer and 11am in the winter, maybe 25%. Takeaway being if you have any shade account for it!
Tilt
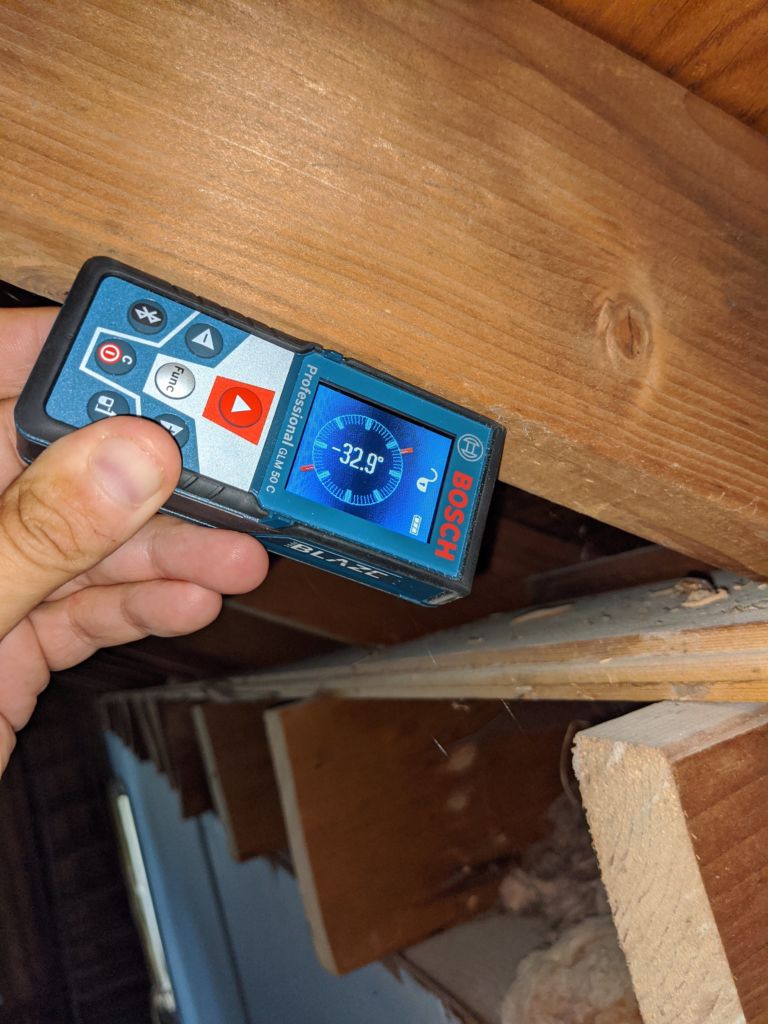
Tilt is the angle the solar array sits with respect to the ground. If you’re mounting them on the roof, it will be the same as your roof pitch. You can measure this with either a digital carpenters gauge or a free cell phone compass app. Most roofs around here vary from around 20deg to 45deg.
Azimuth
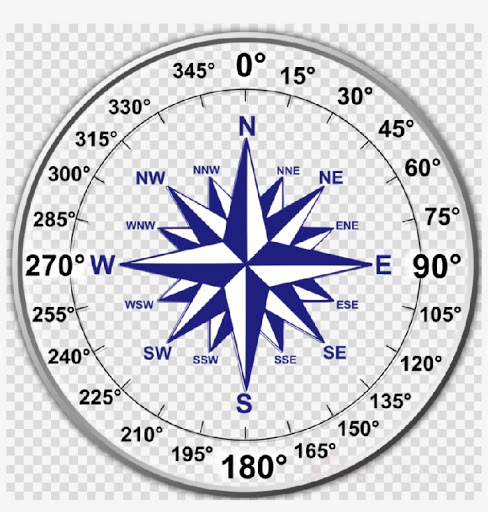
Azimuth is a fancy word for direction or orientation. Since a calculator doesn’t have much use for words like “south or “north-east”, we convert those orientations into numbers by dividing the compass circle into 360 degrees. Meaning true North becomes 0º, East becomes 90º, South becomes 180º (our favorite!), West 270º – and everywhere in between. If the roof you’d like to put solar on faces southwest, you would input an azimuth of somewhere around 210º. For best sunlight conditions, it follows that a good solar azimuth should be between 90º and 270º.
Retail Electricity Rate
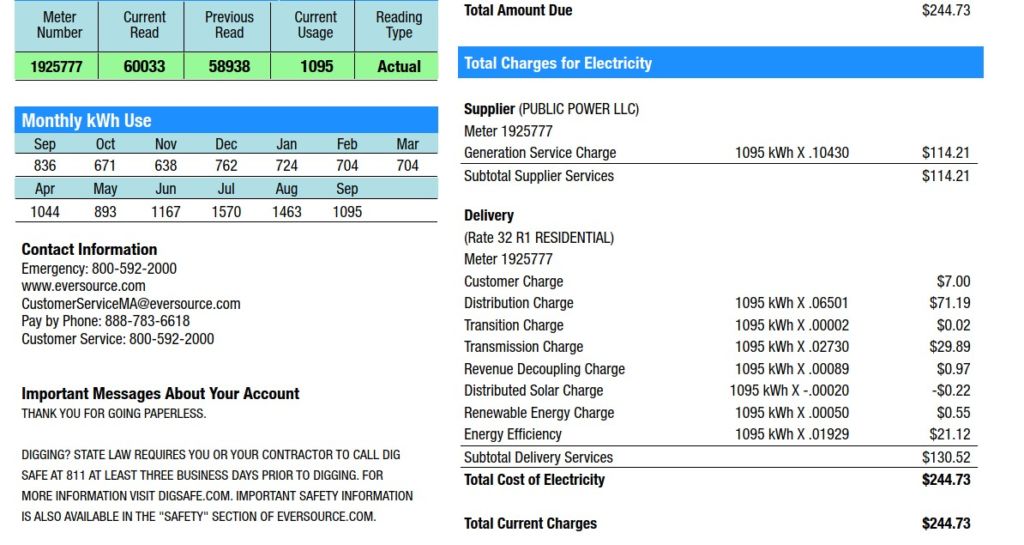
This is total electric rate per kWh, meaning divide your entire bill by the amount of kWh consumed that month. For a an Eversource home, the lowest rate we see is $0.22/kWh. We discussed this topic more in depth in our article about the kWh.
Now that you’ve done the hard work of finding a website, collecting data, and inputting it – you the instant satisfaction of clicking the Go To PVWatts Results arrow!
Calculator Output
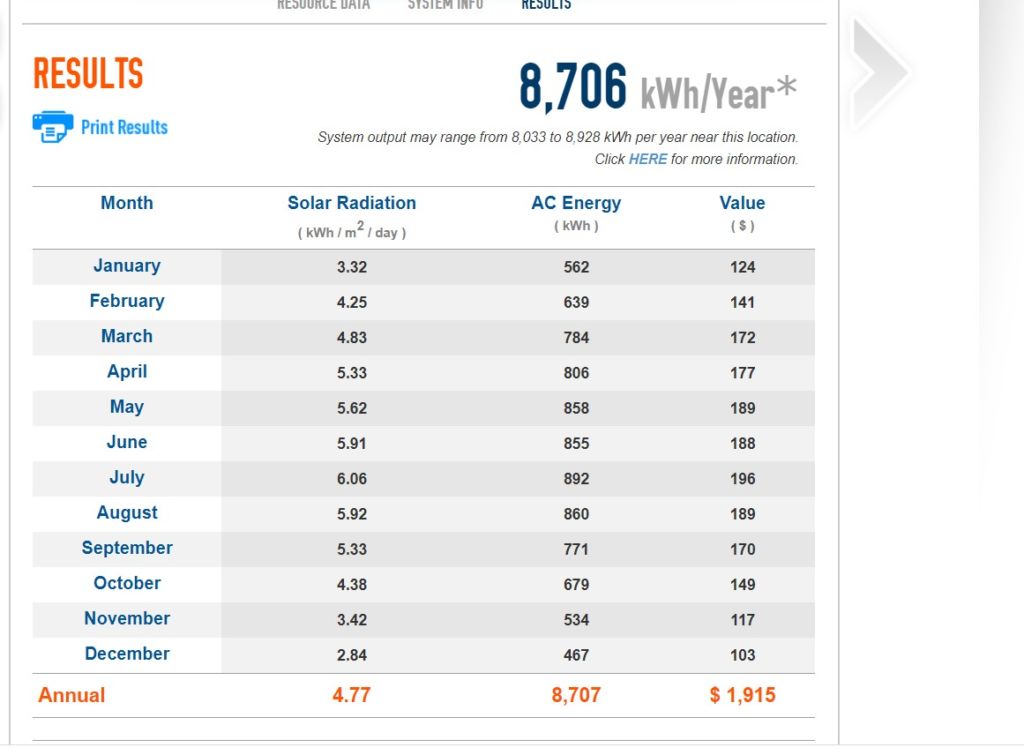
So here we finally have it, a number of kWh’s in a year that your solar panels will generate. This is where you would decide if the roof surface is qualified or not as being good for solar. One important note here – while those electricity savings are real, they’re not showing the whole picture regarding about the overall cost to get the solar system working or the additional incentives. We’ll get into that more later in this series for sure.
What this number does tell us is whether there’s enough electricity reaching the roof compared to the Size (remember we defined Size as the DC wattage of all the panels together). As a genral rule of thumb to ensure a respectful return on investment, we like to see a minimum ratio of 1000kWh of production per 1.0kW of size. In the example images we’ve used here: 7.3kW of Size is producing 8,706kWh which is ratio of 1,192, I’d say green light to move on to Step 2!
Conclusion
In this article we’ve laid out the steps that an interested home or business owner would use to put a usable number on the amount of sunlight reaching their roof. There’s about 7 more steps, which we will be writing about, with this level of detail and commitment to learning before you’ll have a fully operational solar array.
We hope as you follow along with us through those steps you’ll see that our team of solar engineers here at Whaling City Solar are true wizards at they do for our customers. If you are serious about trying to tackle your own solar project, don’t be shy about reaching out to us for advice. At certain point we will start to charge for our time, but we love solar and want to see as much as possible get installed in the community. Stay tuned for Step 2: How to Self-Qualify the Financials of Your Solar Project!