Call Us Mon-Fri from 7:30 am-6:30 pm or Saturday-Sunday: 9:00 am–2:00 pm 508-203-6966
Call Us Mon-Fri from 7:30 am-6:30 pm or Saturday-Sunday: 9:00 am–2:00 pm 508-203-6966

The founding of Whaling City Solar was based answering the question, “How do we show how ‘going solar’ really works to our closest friend?” Everyone has seen ads for “Zero down solar! Lowest price, best equipment, best warranty!” but the whole system and process is…well… a black box. We knew we wanted to do something straight forward and smarter to earn the trust of our South-coast Massachusetts neighbors. To honor our commitment to the integrity of our chosen profession we have created a brand new concept – SeeThru Solar™ – and even went through the effort the trademark it.

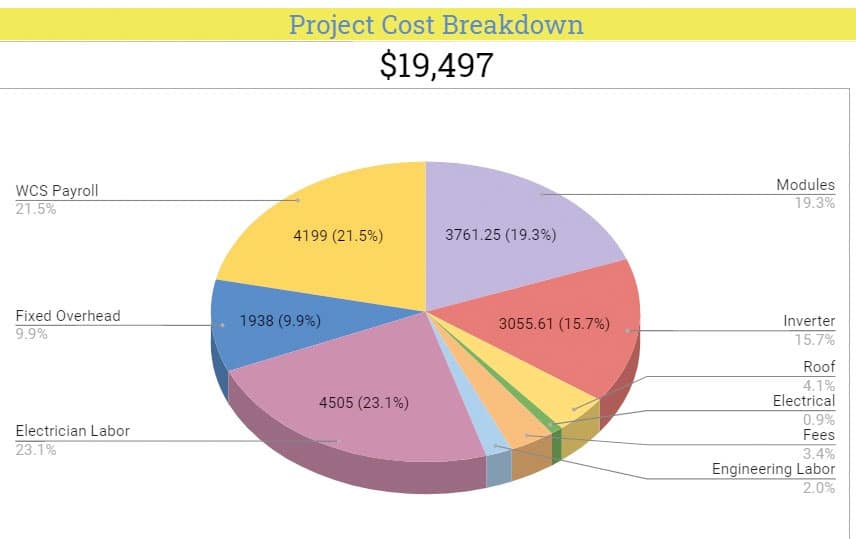
Once you know what it costs to build the system, we’ll get into the details of how you pay for it. Solar industry vernacular prices solar power in terms of “$’s per watt of solar panels” – often shortened to $/W. Since the same roof can fit a wide range of power output depending on panel efficiency it can be tough to compare quotes. $/W is one way you compare different quotes in the same way we compare the $/lb of different cuts at our favorite butcher (143 Market in Mattapoisett by the way).
We take great care to translate all this industry knowledge into normal homeowner speak in our SeeThru Solar™ Proposal. If you want to get a home equity line of credit, we’ll talk with your bank. If you’re paying cash, we make sure you know where your money goes. Maybe you want someone else to own the solar system, we’ll show you how to get solar power on your house spending no money – while saving a small amount monthly. Want to learn more? Check out our SeeThru Solar™ Proposal page.


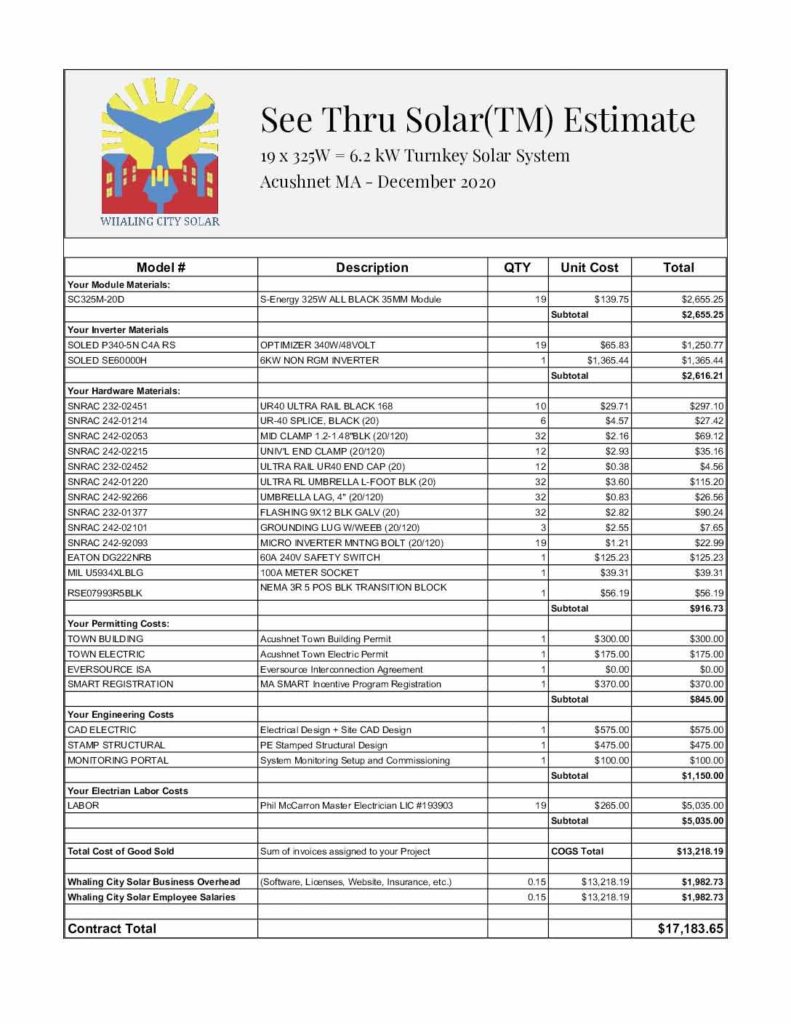
Whaling City Solar was able to purchase each solar panel at 42¢ a watt – or $136.50. To purchase this product directly from this retailer, the customer would have spent $209 plus $75 shipping.
You’ll note, the solar panel is the most expensive piece of individual hardware on a solar power project.

While the solar panels are the part most seen, and thus they get the most attention, the brains of your solar panel system is your inverter. The two components you see above are the ‘optimizers’ that are directly attached to each solar panel which allow the system to mitigate shade, and the central ‘inverter’ which converts the DC energy from the panels into AC energy your house can use.
This hardware allows you to know exactly what every single solar panel is doing. When you’re setup with your monitoring portal, you’ll be able to login to your computer, phone or tablet to check in to your system live 24/7 (we suggest the daytime!).

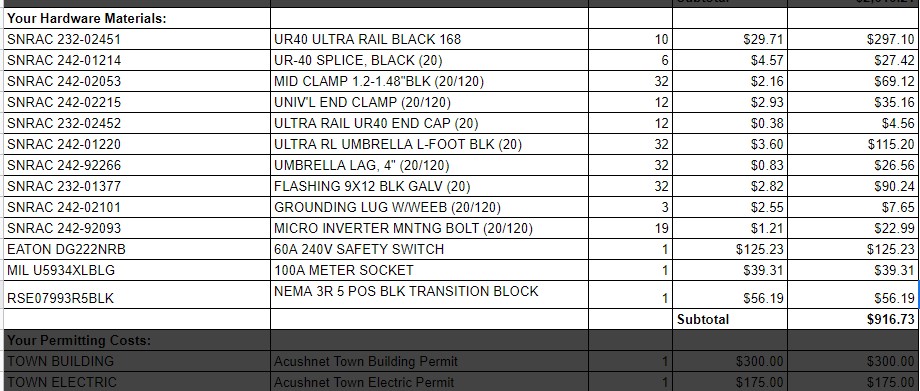
This long list of components is called “racking” – and most of the time, you’ll never see it because it is hidden behind the solar panels. Your racking hardware is what connects directly to your house, and holds the solar panels down. Most of the components are made of aluminum to keep them light. The racking design takes into account wind loading, snow loading, your rafter spacing and size and a number of other variables. Your design will be stamped by a licensed Professional Engineer (P.E.) to ensure it’s compliance to code and it’s integrity over its lifetime.

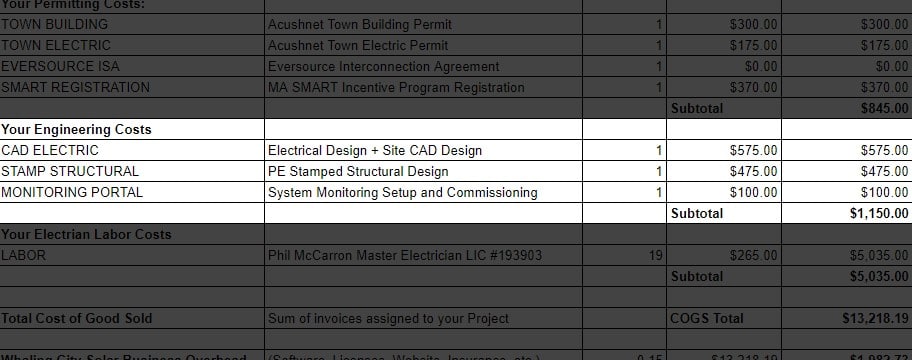
The local authorities having jurisdiction – also known as the town and electricity utility permitting offices – have a very important duty of making sure that we solar contractors install your home solar power system in Massachusetts to very stringent specifications. In additional to these local ordinances, we also need separate permits from the utility to tie into their grid, as well as the state energy office to register your system for all your qualified incentives. These fees will vary slightly in each town, and are the first things paid for when you put down your deposit.
All in all the required paperwork adds up to over 50 pages of project specific documentation on file with the town, utility and state. We know, because it takes longer for this paperwork to be completed than for us to actually install the solar panels!

From the modules all the way down to your electric box, each and every component on the Bill of Materials must be hand selected by a professional solar engineer to ensure it’s safety and suitability to it’s task. The electrical and structural calculations are done custom for each project site and get attached to the permitting packages. You will receive copies of these CAD plans as well, and but beware they are technical enough to humble the handiest DIY’er.

Here we have the largest line item, and trust us it pays to have the trained and licensed boots up on the roof. Your crew will arrive on site early morning, and split in two sub-units. One group ties-up their safety harnesses and gets up on that steep roof to start laying roofing attachments, racking and laying modules. The other group starts at your electrical panel, inverter and conduit up to the roof. By lunchtime they’ve typically met at the middle to tie the two halves together and start testing – leaving the site spotless clean by 5pm same day.

We sincerely appreciate you keeping your installation local, and in exchange we want to respect you and your ability understand our role in the community as a contractor. Our work week is like most in the service industry – early mornings full of hard, detailed work and hair greying deadlines. Thankfully it gets balanced by the smile on our customers faces the day we flip the switch to their new renewable power source. Our employees and their families all live here in the SouthCoast, and we are truly grateful each time our neighbors entrust us with such a large home project.